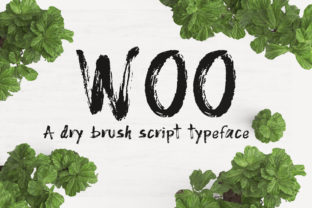
Woo: A Handwritten Dry Brush Font That Brings Grunge to Your Projects
If you’ve ever scrolled through font libraries hoping for something that feels raw, expressive, and imperfect, you’ve likely come across Woo. This dry brush handwritten script stands out because it’s not a digitized imitation — it was made by using real dry brush strokes. That means each letter carries the subtle irregularities, ink splatters, and texture you get from actual brushwork. It’s grungy, it’s bold, and it’s full of personality.
But here’s the thing: fonts like Woo are easy to fall in love with and just as easy to misuse. Many people download it, throw it into a design, and wonder why the result looks messy or unreadable. The problem isn’t the font — it’s how it’s being used. Let’s walk through the common mistakes people make with Woo and, more importantly, how to use it in a way that makes your work look intentional rather than noisy.
Mistake #1: Treating Woo Like a Standard Script Font
Because Woo has a handwritten appearance, some designers assume they can use it anywhere they’d use a cursive or script font. That’s a quick way to end up with text that’s hard to read. Real dry brush strokes create uneven thickness, sharp edges, and gaps — that’s part of the charm, but it also means Woo demands space.
The impact: Using Woo for long paragraphs or very small text (below 18–20 points) will cause letters to blend together. Readers will strain to make out words, and your message gets lost.
Better approach: Reserve Woo for headlines, logos, short taglines, or single words. If you need body copy, pair Woo with a clean, neutral sans-serif (like Open Sans or Montserrat) and keep Woo for display purposes. For example, a poster for a music festival could use Woo on the event name and a simple sans-serif for the lineup details.
Mistake #2: Ignoring Letter Spacing and Line Height
Dry brush letters aren’t monospaced or perfectly regular. When you place them too close together, the strokes overlap and create dark blobs. Many beginners assume default kerning will work fine — it often doesn’t with grunge scripts.
The effect: Tight spacing kills the dry brush texture; you lose the “brush” feel and end up with an unreadable mass.
Practical fix: Always increase letter-spacing slightly (try +5 to +10 on the tracking) when using Woo at larger sizes. For line height, give each line extra breathing room — 1.5 or higher. This isn’t a font you want to cram together. Think of each letter as a brushstroke that needs its own space to be seen.
Mistake #3: Using Woo on Busy or Low-Contrast Backgrounds
Woo thrives on contrast. The natural ink splatters and rough edges pop when placed against a simple, light or dark background. But put it over a textured photo, a pattern, or even a mid-tone color, and the details disappear.
What happens: The font becomes a murky shape. The dry brush effect that makes Woo special gets swallowed by the background noise.
How to avoid this: Test your design in grayscale first. If you can’t clearly read the word without color, the background is too busy. For prints like T-shirts or posters, use Woo on solid colors or subtle gradients. If you must place it over an image, add a dark or light overlay behind the text, or use a drop shadow with enough opacity to separate the letters.
Mistake #4: Overusing Grunge Effects on Top of the Font
Woo already includes plenty of grunge — those rough edges, varying strokes, and ink splashes are built into the design. Yet some designers add extra textures, distress filters, or multiple layering effects. The result can feel chaotic.
The downside: Too many effects cancel each other out. Your design ends up looking unintentionally messy rather than artfully grungy.
Smarter move: Let Woo carry the weight of the grunge. Use it on its own or with very subtle textures in the background. If you want to add a worn look, add it to other elements (like borders or images) and keep the typography cleanly distressed — not double-distressed.
Mistake #5: Downloading Woo from Unofficial Sources
Woo is a popular font, which means you’ll find it on free font sites, torrents, and unofficial bundles. Those versions often have missing characters, corrupted outlines, or incomplete glyph sets. They may also lack proper licensing for commercial work.
Risks: You might end up with a version that doesn’t include numbers, special characters, or alternate glyphs. Worse, if you use an unlicensed copy for a client project, you risk legal issues or having to buy a license retroactively.
What to do: Buy Woo from a reputable foundry (like Creative Market, MyFonts, or the designer’s own site). Check the license: can you use it for logos? For merchandise? For web embedding? The extra cost ensures you get the full set — expect support for multilingual characters, ligatures, and proper kerning.
Mistake #6: Forgetting to Test Woo at Different Sizes and Mediums
What looks perfect on screen at 72 px may look completely different when printed at 36 pt or when scaled down for a small badge. Dry brush details — thin hairline strokes, ink splatters — can disappear at small sizes or become too chunky at huge sizes.
The problem: You commit to Woo in a design, then realize the word is illegible on a business card or too overwhelming on a billboard.
Better practice: Always preview Woo at the actual size it will be used. For print, do a physical test print at 100% scale. For web, check at multiple viewport sizes. If the smallest size is below 20 px, consider using a less detailed font for that element. Woo works beautifully for large headlines (48 px and up) but struggles below 16 px.
Mistake #7: Not Checking Glyph Support for Your Language
Woo was designed with a certain glyph set. If your project includes accented characters (é, ü, ñ, ç), ligatures, or special punctuation (like curly quotes, em dashes, arrows), make sure the version you have includes them. Some free versions cut corners.
What can happen: You type a word with an accent, and Woo substitutes a generic character or nothing at all. The design breaks.
Advice: Before buying or downloading, look at the character map. Most font marketplaces show the full glyph set. If you need wide language support, look for a “Pro” version or check the designer’s notes.
Mistake #8: Overlooking the Value of Alternates and Swashes
Many commercial versions of Woo include alternate glyphs or swash endings — letters that have longer strokes or different shapes. Ignoring these is a missed opportunity to make your typography look unique and natural, just like real handwriting.
The result: Your text looks more rigid and less organic because you’re using the default letter forms in a repetitive way.
How to use them: In software like Adobe Illustrator or Photoshop, open the Glyphs panel and manually swap certain letters for alternates. For example, use a swash “W” or “o” to add flair to a logo. This small step elevates your design from “generic font” to “custom lettering.”
Mistake #9: Treating Woo as a Standalone Branding Font
Woo is excellent for accent elements, but using it alone across all brand communications can backfire. A grunge script doesn’t convey professionalism for every business type. For a vintage barbershop or an indie band, it works great. For a law firm or a medical practice, not so much.
Where people slip: Beginners often pick a cool font and try to make it fit every application — website headings, email signatures, invoices, brochures — without considering brand tone.
Smarter approach: Build a font family. Use Woo for select high-impact moments (like a logo or hero headline) and pair it with a neutral, highly readable font for everything else. This gives you the grunge character where it counts while keeping the overall communication clear and trustworthy.
Mistake #10: Neglecting File Format and Web Optimization
If you’re using Woo on a website, the file format matters. A standard TTF or OTF may not be optimized for the web, leading to slow loading times or inconsistent rendering across browsers. Some developers forget to include the proper @font-face declarations or forget to subset the font.
The drawback: Slow page loads, flash of invisible text, or mismatched letterforms between browsers.
How to fix: Use a web font service if available, or convert your licensed font to WOFF and WOFF2 formats. Also consider subsetting the font to include only the characters you actually need (e.g., Latin basic) to reduce file size. Test across Chrome, Firefox, and Safari at minimum.
What to Check Before You Commit to Woo
License: Can you use it for web, desktop, or both? Does it allow embedding in apps or ebooks?
Glyph set: Does it support the languages or special characters you need?
File types: Are OTF, TTF, WOFF, and WOFF2 included?
Context: Does the grunge level match your project tone?
Scale: Have you tested it at your final output size?
Pairing: Have you chosen a complementary second font?
These checks take ten minutes but save you from redesigns, licensing fees, and clunky typography.
The Bottom Line on Woo
Woo is a fantastic dry brush script. It brings real handwritten texture and grunge energy that’s hard to find in polished digital fonts. But its power lies in how deliberately you use it. Avoid the common mistakes — using it too small, on busy backgrounds, without spacing, or in the wrong context — and you’ll see why designers reach for Woo for posters, packaging, social media headers, and branding that needs an offbeat, human touch.
Treat Woo as a specialty tool, not your everyday workhorse. Give it room to breathe, pair it wisely, and buy the real version. Your designs will thank you.